Link a project to a data document
Linking to a global or hierarchy data document is used to arrange complex data exchange; for example, when you model opcost sharing, tariffs, carbon trading and so on. Linking allows you to create a mechanism where data are collected from projects into a data document, processed and distributed back to projects.
You can link a project to any global data document stored in the library, or to a hierarchy data document created in the consolidation node to which the project belongs. The linking process is the same for both document types.
Note: If you want to create a link to an HDD, make sure the document exists in the hierarchy. If the HDD does not exist, you need to create it before linking.
You can create links to pull data from a data document into the project, and to push the data from the project into a data document; in both cases you need to follow the same basic steps.
Note: Links can be created only in columns used for data entry. To find out if you can link a particular column, right-click on it and check if the context menu contains the Link to External Source option.
To create a link to a data document:
- Open the project and scroll to the column where you want to place the link.
- Right-click on any cell and select the Link to External Source option from the context menu. Links are automatically expanded to fill the whole column, so it does not matter which cell you choose.
- The Data Link Source dialog will be displayed.

- Select the type of document to be linked and click OK. The New Data Link window will be opened.

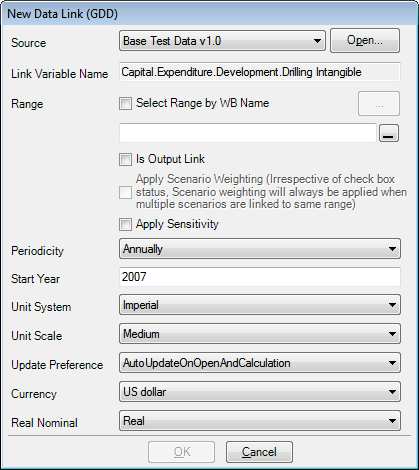
- The Source field contains the list of available data documents. The list changes depending on the selected document type and, in the case of hierarchy data documents, on the project's position in the hierarchy. Select the document you want to link. Click on the Open button to view the selected data document.
- The Link Variable Name field is automatically filled in with the name of the linked variable in the opened project.
-
Now you need to choose a range of cells in the selected data document that will be linked to the opened project. You can choose a named range (if the selected data document contains named ranges) or select cells directly in the document.
To use named ranges, check the Select Range by WB Name box. The Browse button
 will become active. Click on it to view the list of available ranges.
To select a range directly in the data document, click on
. The New Data Link window will be collapsed and you will be taken to the data document. Select all cells you want to link. The names of selected cells will appear in the collapsed window. Click on
to expand the window. The names of selected cells will now appear in the text box.
-
If you want to push the data from the project into the data document, check the Is Output Link box. If this box is not checked, the data will be pulled from the data document into the project.
When the Is Output Link box is checked, the Apply Scenario Weighting box becomes active. Check it to apply weightings to data being pushed out into the data document. Scenario weightings are specified in project settings. Weightings will be applied anyway if you link variables from different project scenarios to the same range in the data document.
- Check the Apply Sensitivity box if you want to apply sensitivities set in the project to values going through the link. By default, linked values are not sensitized.
- Set the periodicity of the linked data in the Periodicity field. For example, if the data document contains annual data and this field is set to Annually, then, when the project is set to Annually too, the linked values will be displayed exactly as in the data document. But if you set this field to Monthly, then data for 2008 in the data document will become data for 2008-01 in the project, 2009 will become 2008-02 and so on.
- The Start Year field shows which year in the project will correspond to the first cell of the selected range in the data document.
- The Unit System and Unit Scale fields display the corresponding settings of the linked data. In the image above they show that the values in the data document are in Imperial units and medium scale. The same applies to the Currency and Real/Nominal fields. Changing any of these settings will not change the data in the linked data document.
- The Update Preference field determines how often the linked data will be updated. The most frequently used option is Auto Update On Open and Calculation: the linked data are automatically refreshed when you open or calculate a project. But if your project contains many links and you calculate it frequently, automatic updates can take time; in this case, use the Manual Update option and update values when you need to (see Manage links in a project).
- Once all fields have been populated and settings selected, click OK to create the link.
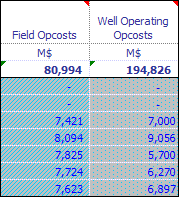
- You will be taken back to the project. If the link has been created successfully, linked cells will be filled with values and their background color and pattern will change. The image below shows linked cells with default background settings; these settings can be changed by users (see Default Settings).

To link a linked column to another data document or cell range, right-click on it and select the Change Link Source option from the context menu. The Update Data Link window containing the current settings will be displayed. Change the settings and click OK.
To remove a link, right-click on any cell in the linked column and select the Break Link option from the context menu. The values in the column will remain but the cell background will change to white.